
Build A MySQL Database
MySQL is a free and open-source relational database management system (RDBMS) and is used by many database-driven web applications. Its name is a combination of the co-founder Michael Widenius' daughter name "My" and the abbreviation of Structured Query Language "SQL." MySQL is currently owned by Oracle Corporation and is also available under a variety of commercial license options. Due to concerns over acquisition of MySQL by Oracle in 2009, some of the original developers of MySQL forked MySQL and created MariaDB, which is named after Widenius' younger daughter, Maria. MariaDB is intended to remain free and open source, and to maintain high compability with MySQL.
In this article we will show you how to build a MySQL database on a Linux machine.
Here are syntax notations we use to show the shell and mysql commands in this article:
$ mysql -u root
mysql> \q
$
The "$" sign is the Linux shell prompt. The MySQL client program mysql can be used to interact with database server and make queries. The "mysql>" is the prompt of interactive mode. The "\q" (or "quit", or "exit") exits the interactive mode and brings us back to the Linux shell.
Install MySQL
Oracle provides many pre-packaged binary distributions of MySQL. For detail, please refer to MySQL Installation Guide. As an example, we will install MySQL version 8.0 to an Ubuntu machine from Ubuntu software repository.
$ sudo apt-get update
$ sudo apt-get install mysql-serverAfter the package is installed, we can check the version
$ mysql -V
mysql  Ver 8.0.35-0ubuntu0.20.04.1 for Linux on x86_64 ((Ubuntu))
The installation creates the default MySQL data directory /var/lib/mysql, where MySQL stores database files and server information:
$ sudo ls /var/lib/mysql
'#ib_16384_0.dblwr'   auto.cnf        ca-key.pem        debian-5.7.flag   mysql.ibd            server-cert.pem   undo_002
'#ib_16384_1.dblwr'   binlog.000001   ca.pem            ib_buffer_pool    performance_schema   server-key.pem
'#innodb_redo'        binlog.000002   client-cert.pem   ibdata1           private_key.pem      sys
'#innodb_temp'        binlog.index    client-key.pem    mysql             public_key.pem       undo_001
If, for some reason, you want to create your own data directory, you can use same server program mysqld with options --initialize or --initialize-insecure, and --datadir that points to your own data directory:
$ sudo mysqld --initialize --user=mysql --datadir=/new_data_directoryThe difference between options --initialize and --initialize-insecure is the initial password of database account 'root'@'localhost'. The former has a random password and the latter has no password. The first thing we should do after the installation is securing the access of this initial root account.
Configure MySQL
Let's start the MySQL server. Those familiar with Linux may expect to use command "systemctl start mysql" to start the MySQL service. However, if you use the Docker container from the codespace, systemd has overhead and is generally not run. In this case, we start the server from the service command
$ sudo service mysql start
 * Starting MySQL database server mysqld
su: warning: cannot change directory to /nonexistent: No such file or directorymysql:x:106:108:MySQL Server,,,:/nonexistent:/bin/false$sudo service mysql stop
$sudo usermod -d /var/lib/mysql/ mysqlNote that the default shell of the mysql user is /bin/false, which does not exist. If you try to login as mysql user, it will fail. You must assign a valid shell if you want to login as this user.
After the server started, the first thing we should do is securing the 'root'@'localhost' account. MySQL supports many authentication methods through plugins. In MySQL 8.0, the default plugin is caching_sha2_password, which uses SHA-256 authentication and server-side caching for better performance. The old MySQL version uses mysql_native_password which is based on the password hashing method. We can check the plugin used by the account from mysql.user table after we connect to the server.
In the case that the account has no password, to connect to the server
$ sudo mysql -u root[Note] [MY-010454] [Server] A temporary password is generated for root@localhost: f-tS0d-;?T&6$ sudo mysql -u root -p
Enter password:f-tS0d-;?T&6
mysql> ALTER USER 'root'@'localhost' IDENTIFIED BY 'root-password';
mysql> SELECT user, host, plugin FROM mysql.user;
+------------------+-----------+-----------------------+
| user | host | plugin |
+------------------+-----------+-----------------------+
| mysql.infoschema | localhost | caching_sha2_password |
| mysql.session | localhost | caching_sha2_password |
| mysql.sys | localhost | caching_sha2_password |
| root | localhost | caching_sha2_password |
+------------------+-----------+-----------------------+
4 rows in set (0.00 sec)$ mysql -u root -p
Enter password:
ERROR 2002 (HY000): Can't connect to local MySQL server through socket '/var/run/mysqld/mysqld.sock' (13)$ ls -ld /var/run/mysqld
drwx------ 2 mysql mysql 4096 Jan 3 18:23 /var/run/mysqldmysql -h 127.0.0.1 -u root -p
Enter password:
mysql> $ sudo chmod 755 /var/run/mysqld
$ mysql -u root -p
Enter password:
mysql> For secure reason, we may only want local root user to connect to the server as root account. In such case, we can use auth_socket plugin:
mysql> INSTALL PLUGIN auth_socket SONAME 'auth_socket.so';
mysql> ALTER USER 'root'@'localhost' IDENTIFIED WITH auth_socket;
mysql> SELECT user, host, plugin FROM mysql.user WHERE user = 'root';
+------+-----------+-------------+
| user | host      | plugin      |
+------+-----------+-------------+
| root | localhost | auth_socket |
+------+-----------+-------------+
1 row in set (0.00 sec)$ mysql -u root
ERROR 1698 (28000): Access denied for user 'root'@'localhost'
$ sudo mysql -h 127.0.0.1 -u root
ERROR 1698 (28000): Access denied for user 'root'@'localhost'
$ sudo mysql -u root
mysql> The MySQL package provides a command line utility, mysql_secure_installation, that helps you implement several security recommendations
- Install validate password component and set the level of password validation policy;
- Remove remote access of root account;
- Remove anonymous user account;
- Remove the test database.
Create Database
Let's see what databases we have after the installation:
mysql> SHOW DATABASES;
+--------------------+
| Database           |
+--------------------+
| information_schema |
| mysql              |
| performance_schema |
| sys                |
+--------------------+
4 rows in set (0.00 sec)- mysql - is the system database which contains information required by the MySQL server.
- information_schema - uses no database directory and provides ANSI-standard set of views for database metadata.
- performance_schema - provides Performance Schema for monitoring server execution at low level.
- sys - helps interpret data collected by Performance Schema.
mysql> CREATE DATABASE mydb;
Query OK, 1 row affected (0.05 sec)

mysql> SHOW DATABASES LIKE 'mydb';
+-----------------+
| Database (mydb) |
+-----------------+
| mydb            |
+-----------------+
1 row in set (0.00 sec)

mysql> USE mydb;
Database changed
mysql> SELECT DATABASE();
+------------+
| DATABASE() |
+------------+
| mydb       |
+------------+
1 row in set (0.00 sec)$ sudo ls /var/lib/mysql/mydb
$ mysql> CREATE USER 'myuser'@'localhost' IDENTIFIED BY 'mypassword';
Query OK, 0 rows affected (0.05 sec)
mysql> GRANT ALL PRIVILEGES ON mydb.* TO 'myuser'@'localhost';
Query OK, 0 rows affected (0.03 sec)$ mysql -u myuser -p mydb
Enter password:
mysql> SELECT DATABASE();
+------------+
| DATABASE() |
+------------+
| mydb |
+------------+
1 row in set (0.00 sec)
mysql> USE mysql;
ERROR 1044 (42000): Access denied for user 'myuser'@'localhost' to database 'mysql'Create Tablespace
MySQL server uses pluggable storage engines to handle the SQL operations for different table types. To see which storage engines the server supported
mysql> SHOW ENGINES;
+--------------------+---------+----------------------------------------------------------------+--------------+------+------------+
| Engine             | Support | Comment                                                        | Transactions | XA   | Savepoints |
+--------------------+---------+----------------------------------------------------------------+--------------+------+------------+
| ARCHIVE            | YES     | Archive storage engine                                         | NO           | NO   | NO         |
| BLACKHOLE          | YES     | /dev/null storage engine (anything you write to it disappears) | NO           | NO   | NO         |
| MRG_MYISAM         | YES     | Collection of identical MyISAM tables                          | NO           | NO   | NO         |
| FEDERATED          | NO      | Federated MySQL storage engine                                 | NULL         | NULL | NULL       |
| MyISAM             | YES     | MyISAM storage engine                                          | NO           | NO   | NO         |
| PERFORMANCE_SCHEMA | YES     | Performance Schema                                             | NO           | NO   | NO         |
| InnoDB             | DEFAULT | Supports transactions, row-level locking, and foreign keys     | YES          | YES  | YES        |
| MEMORY             | YES     | Hash based, stored in memory, useful for temporary tables      | NO           | NO   | NO         |
| CSV                | YES     | CSV storage engine                                             | NO           | NO   | NO         |
+--------------------+---------+----------------------------------------------------------------+--------------+------+------------+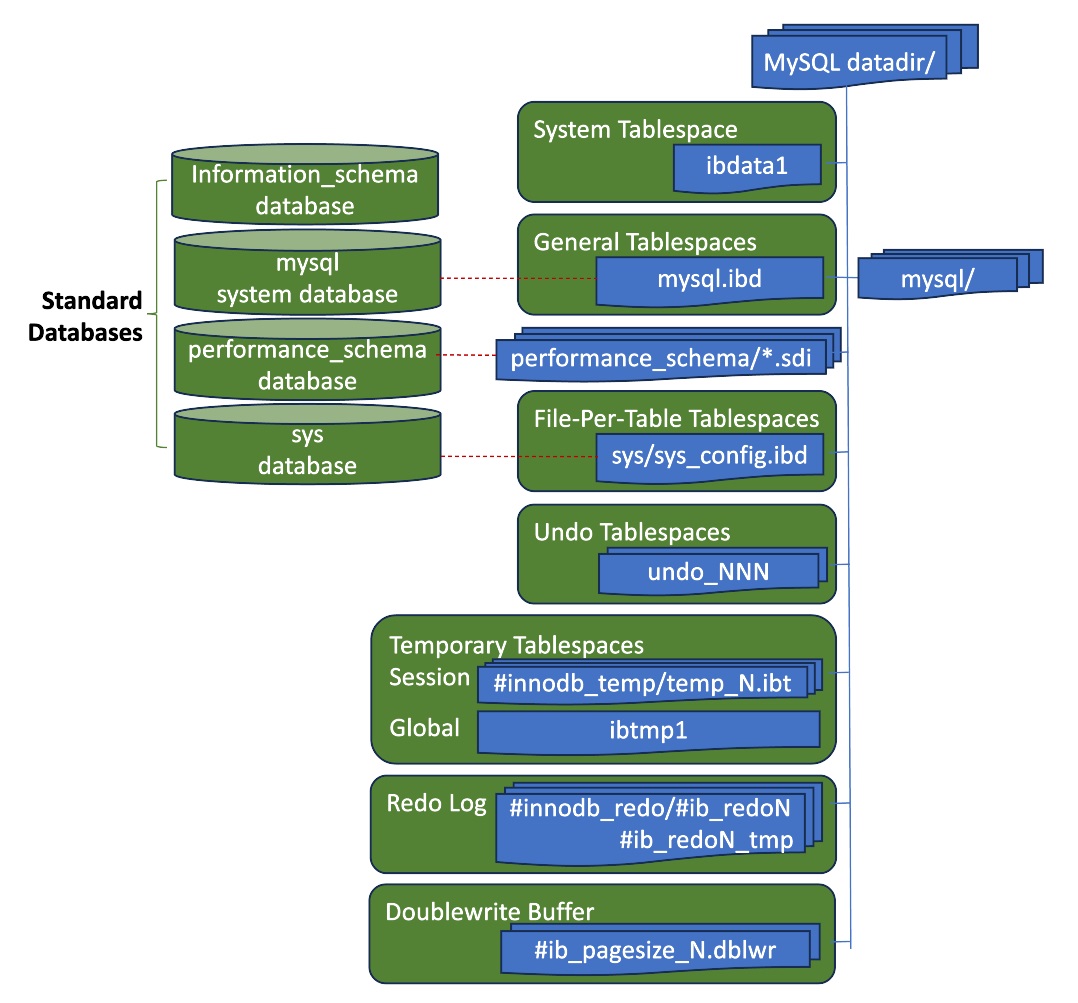
9 rows in set (0.01 sec)InnoDB stores its tables and indexes in a tablespace. A tablespace is a logical structure associated with data files and logical storage used as a container for tables and indexes. To see MySQL tablespaces and data files in which the tablespace data is stored
mysql> SELECT file_id, file_name, file_type, tablespace_name, engine FROM information_schema.files;
+------------+----------------------+------------+------------------+--------+
| FILE_ID    | FILE_NAME            | FILE_TYPE  | TABLESPACE_NAME  | ENGINE |
+------------+----------------------+------------+------------------+--------+
| 4294967294 | ./mysql.ibd          | TABLESPACE | mysql            | InnoDB |
|          0 | ./ibdata1            | TABLESPACE | innodb_system    | InnoDB |
| 4294967293 | ./ibtmp1             | TEMPORARY  | innodb_temporary | InnoDB |
| 4294967279 | ./undo_001           | UNDO LOG   | innodb_undo_001  | InnoDB |
| 4294967278 | ./undo_002           | UNDO LOG   | innodb_undo_002  | InnoDB |
|          1 | ./sys/sys_config.ibd | TABLESPACE | sys/sys_config   | InnoDB |
+------------+----------------------+------------+------------------+--------+
6 rows in set (0.02 sec)A general tablespace is similar to system tablespace, which is a shared tablespace and can store multiple tables. The shared tablespace does not shrink in size. The free space from truncating or dropping tables stored in a shared tablespace can only be used for new data. Space is not released back to the file system. The tablespace mysql is a general tablespace and contains data dictionary tables that store database object metadata, and system tables used for other operational purposes.
A file-per-table tablespace contains data and indexes for a single table, and is stored in a single file. Its advantage over shared tablespace is that disk space is returned to the file system after truncating or dropping a table created in the tablespace. However, it has disadvantage that the server has to open file handle per table and requires more file descriptors. It may consume more memory since the server keeps tablespace metadata in memory for lifetime of tablespace, same number of tables in fewer general tablespace consumes less memory. The tablespace sys/sys_config is a file-per-table tablespace and contains a single table sys_config.
The file-per-table tablespace is automatically created when its single table is created. We have to manually create the general tablespace.
mysql> CREATE TABLESPACE mytblspc ADD DATAFILE 'mytblspc.ibd' Engine = InnoDB;$ sudo ls -l /var/lib/mysql/mytblspc.ibd
-rw-r----- 1 mysql mysql 114688 Jan 6 03:35 /var/lib/mysql/mytblspc.ibdLet's check from the database
mysql> SELECT space, name, space_type, file_size FROM information_schema.innodb_tablespaces;
+------------+------------------+------------+-----------+
| space      | name             | space_type | file_size |
+------------+------------------+------------+-----------+
| 4294967294 | mysql            | General    |  26214400 |
| 4294967293 | innodb_temporary | System     |  12582912 |
| 4294967279 | innodb_undo_001  | Undo       |  16777216 |
| 4294967278 | innodb_undo_002  | Undo       |  16777216 |
|          1 | sys/sys_config   | Single     |    114688 |
|          4 | mytblspc         | General    |    114688 |
+------------+------------------+------------+-----------+
6 rows in set (0.00 sec)